| Tabs Page |
|---|
| id | Description |
|---|
| title | Description |
|---|
| Olympus BX63 upright microscopeP-G Desmarais Building, Room 5308-2
Advanced Microscope Tier 1 usage price Instrument awarded to Dr Marina Martinez by the Canadian Foundation for Innovation (CFI)
Advanced Microscope Tier 1 usage price
Applications - Transmitted light, Bright-field
- Phase contrast
- Polarized light, DIC
Fluorescence - Color camera
Light sources
| Développer |
|---|
| title | X-Cite NOVEM XT910 complete specifications |
|---|
|
| Source | Excitation wavelengths (nm) | Compatible fluorophores | Nominal power (mW) |
|---|
| 365 |
| DAPI, Hoechst |
| | 435 |
| CFP |
| | 475 |
| FITC, GFP |
| | 500-600 | -
[500-600] |
|
| 509/22
[498-520] | YFP |
| 554/23
[542-565] | TRITC |
| 578/21
[567-588] | mCherry |
| | 635 |
| Cy5
|
| 735 |
| Cy7 |
|
|
Objectives 4x/0.16 Air WD TBD16 10x/0.4 Air WD TBD3.1 20x/0.75 Air WD TBD0.6 40x/0.95 Air WD TBD0.18 60x/1.35 Oil WD TBD0.15 100x/1.4 Oil WD TBD0.13 Empty
| Développer |
|---|
| title | Objectives complete specifications |
|---|
|
| Développer |
|---|
| | title | Caractéristiques complètes des objectifs |
|---|
| | Position | Nom | Marque | Nom complet | Identifiant | Ouverture numérique | Immersion | Distance de travail (mm) | Transmittance
(% [nm]) | Technique | Épaisseur du couvre-objet (mm) |
|---|
| 1 | 4x/0.16 Air | Olympus | 4x/0.16 Air UPlanSApo | | 0.16 | Air |
TBD | TBD | TBD| 16 | >90% at 550nm
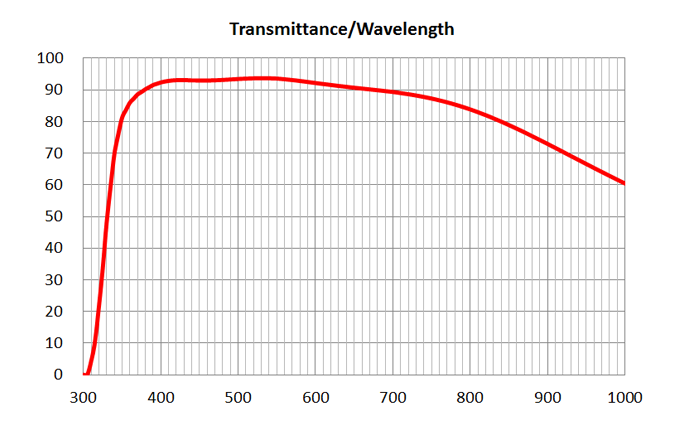 Image Added Image Added | BF, Fluo | - | | 2 | 10x/0.4 Air | Olympus | 10x/0.4 Air
UPlanSApo | UPLXAPO10X.pdf | 0.4 | Air |
TBD | TBD | | 3.1 | ~90% at 550nm
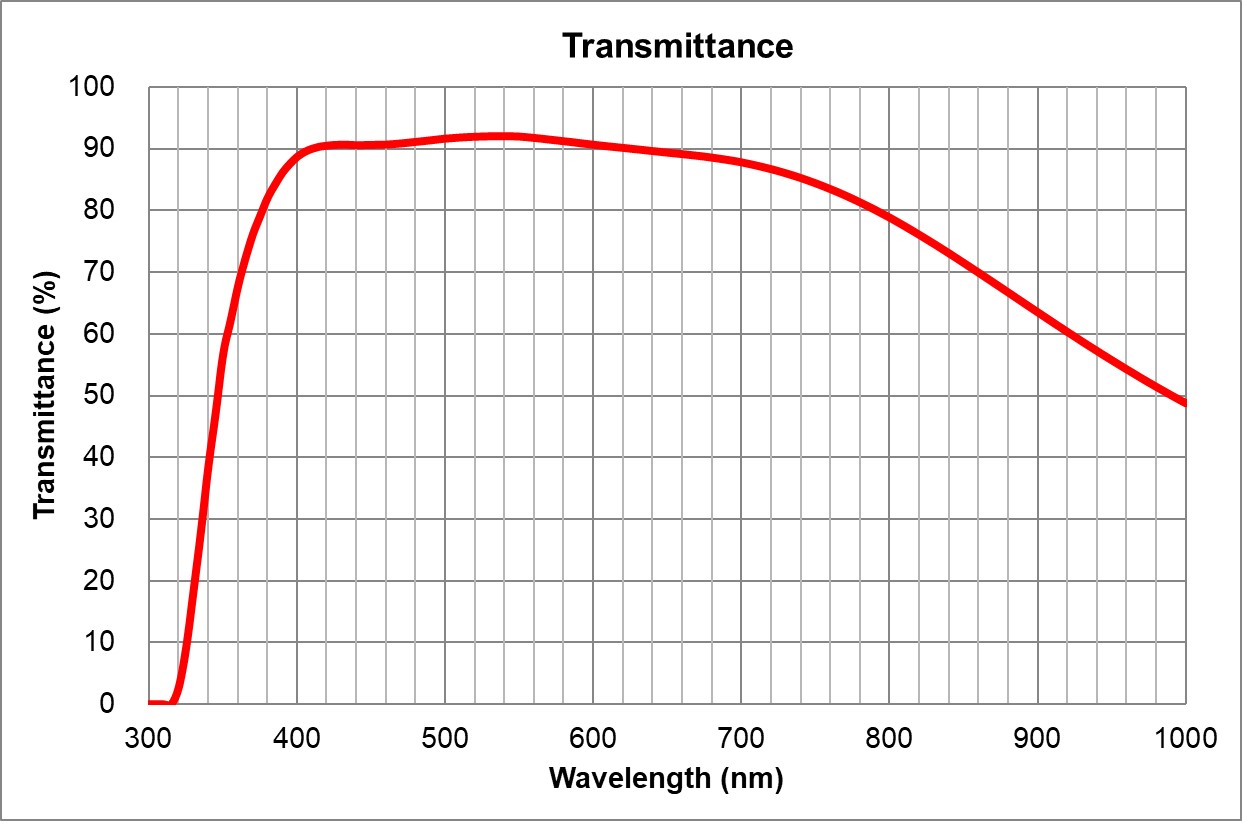 Image Added Image Added | BF, Pol, DIC, Fluo |
| 0.17 | | 3 | | Olympus | 20x/0.75 Air
UPlanSApo | | 0.75 | |
TBD | TBD | | 0.6 | >90% at 550nm
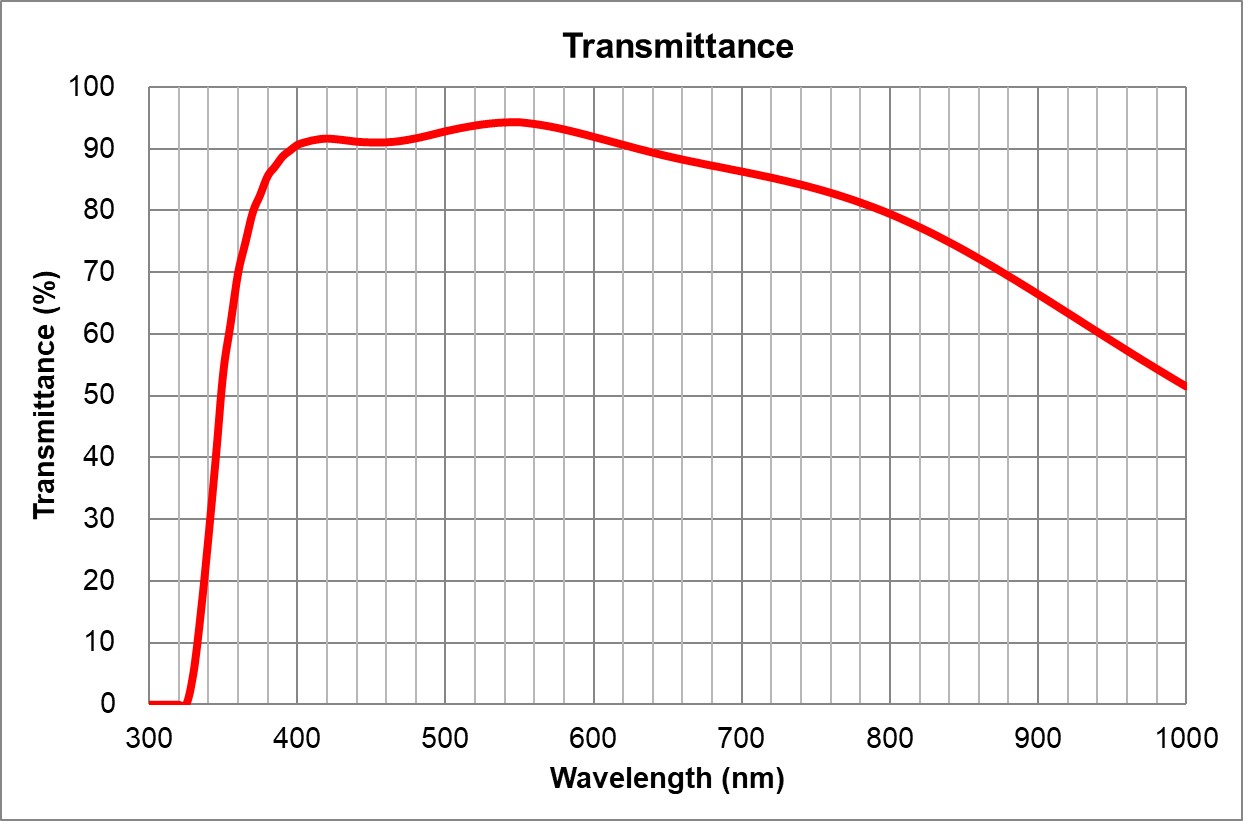 Image Added Image Added | BF, Pol, DIC, Fluo |
| 0.17 | | 4 | 40x/0.95 Air | Olympus | 40x/0.95 Air
UPlanSApo |
TBD | TBD | TBD | Ajustable | 0.18 | ~90% at 550nm
 Image Added Image Added | BF, Pol, DIC, Fluo | Adjustable 0.11-0.23 | | 5 | 60x/1.35 |
| Oil | Olympus | 60x/1.35 Oil
UPlanSApo | | 1.35 | |
| Huile | | 0.15 | ~90% at 550nm
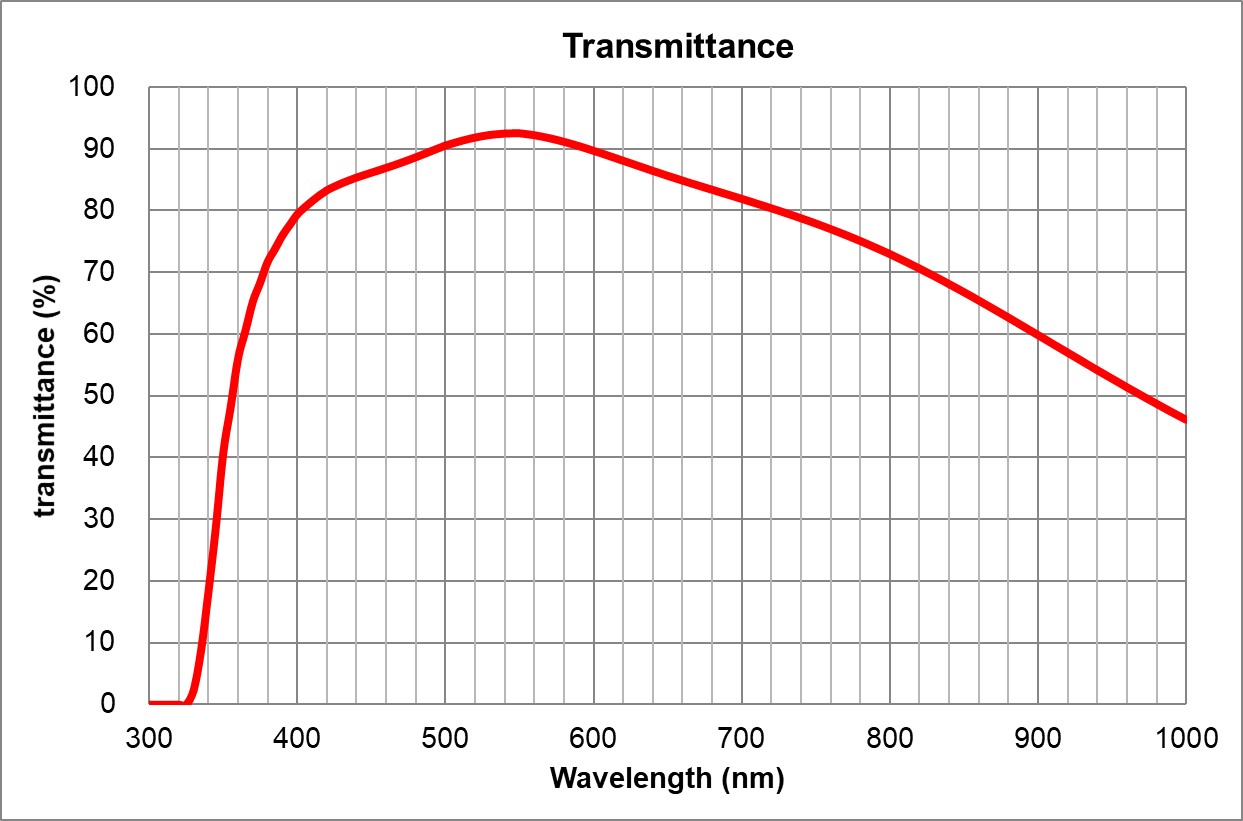 Image Added Image Added | BF, Pol, DIC, Fluo |
TBD | TBD | TBD Huile | Olympus | 100x/1.4 Oil
UPlanSApo | | 1.4 | |
| Huile | TBD | TBD | | 0.13 | ~90% at 550nm
 Image Added Image Added | BF, Pol, DIC, Fluo |
BF: Champ clair ( Bright-field )
Pol:
Lumière polarisée
PhC: Contraste de phasePolarized light
DIC: Differential interference contrast
Fluo: Fluorescence
Filters - Empty
Filters- DAPI
GFP/FITC (CFP) Cy5 DAPI/GFP/Cy3/Cy5 (requires Cy3 filter in Lumencor SpectraX Green/Yellow position) - DIC Analyzer
- FITC
- TRITC
- mCherry
- Empty
- Empty
- U-FDICT DIC Analyzer (Nomarski prismCFP/YFP/mCherry (requires mCherry filter in Lumencor SpectraX Green/Yellow position)
| Développer |
|---|
| title | Filters complete specifications |
|---|
|
| Position | Name | Brand | ID | Excitation Filter | Dichroic mirror | Emission Filter | Comments |
|---|
| 1 | DAPIEmpty |
|
|
|
|
|
| | Nikon2 | DAPI-U HQ | 395/25x
[383-408] | 425LP | 460/50m
[435-485] | C-FL-C DAPI-U HQ | 2 | GFP | Semrock | GFP-4050B-000 | 466/40x
[446-486] | 495LP | 525/50m
[500-550]Nikon ID 96372 | | 3 | Cy5 | Semrock | Cy5-5070A | 617/55x
[590-645] | 652LP | 697/77m
[659-736] | Nikon ID 96376 | | 4 | DAPI/GFP/Cy3/Cy5 | Semrock | C182279 | None | 409/493/573/652 | 432/515/595/681 | 77074160 Custom Quad C182279.
Excitation filters are in the Lumencor SpectraX light source | | 5 | DIC Analyzer | Nikon | Ti2-C-DICACL | Not Applicable | Not Applicable | Not Applicable | Used for DIC imaging | | 6 | CFP\YFP\mCherry | Semrock | C1997767 | None | 459/526/596 | 475/543/702 | Excitation filters are in the Lumencor SpectraX light source | | Olympus | U-FUNA | 360-370 | 410LP | 420-460 |  Image Added Image Added
| | 3 | FITC | Olympus | U-FBNA | 470-495 | 505LP | 510-550 |  Image Added Image Added
| | 4 | TRITC | Olympus | U-FGWA | 530-550 | 570LP | 575-625 |  Image Added Image Added
| | 5 | mCherry | Olympus | U-FYW | 540-585 | 595LP | 600LP |  Image Added Image Added
| | 6 | Empty |
|
|
|
|
|
| | 7 | Empty |
|
|
|
|
|
| | 8 | DIC Analyzer | Olympus | U-FDICT DIC | - | - | - | DIC Analyzer |
|
DetectorDetector Olympus DP80 Dual sensors (color and monochrome) CCD camera, 6.45 x 6.45 um pixel size,15 images/s at full frame 55% QE at 550nm
Color mode 4080 x 3072 pixels, 24-bit
Monochrome mode 1360 x 1024 pixels, 14-bit
Olympus_DP80 Camera_User Guide.pdf
|
| Tabs Page |
|---|
| id | User Guide |
|---|
| title | User Guide |
|---|
|
| UI Expand |
|---|
| - Turn on the computer (#1)
- Remove the cover Remove the dust cover from the microscope
- Turn on the computer (#1)
- Turn on the microscope power bar(#2)
If incubation is required, turn Turn on the Okolab incubation module (#3A), the Lauda water bath (#3B) and open the CO2 (#3C) and N2 (#3D) tanks | Avertissement |
|---|
Make sure the humidifier and the water bath are clean and properly filled with distilled water. |
microscope touchscreen (switch is located at the back on the right of the touch screen) (#3) Use your UdeM credentials to log in to Windows Start the software NIS-Elements| Info |
|---|
The first time you use the instrument, you need to import the microscope settings into the software. To do this follow the instructions in the First use |
protocol
- Start the software CellSens Dimension
|
| UI Expand |
|---|
| When using the microscope for the first time, you need to import the microscope settings into the software. You will usually do this during the training session.
This procedure can also be performed if something is not working properly and if you want to reset the software to its original settings. | Remarque |
|---|
This process will delete all experiment protocols and reset the software to the original settings for this specific microscope. |
- If open, close the software CellSens Dimension and wait until it is completely closed (up to 30 seconds)
- On your Desktop open the folder Documentation
- Double-click Settings for BX-63
- A script will run and a black window will briefly appear
- You can now reopen the software CellSens Dimension
Save your dataClose NIS-Elements software
Transfer your data to the D: drive (Data Storage) or to your external drive and delete it from the local C: driveTurn off the computerIf oil objectives were used, clean it with lens cleaner and lens paper (not Kimwipes)If incubation was used, turn off the Okolab incubation module (#3A),Lauda water bath (#3B) and close the CO2 (#3C) and N2 (#3D) tanksWait until the SpectaX has cooled down and turn off the microscope power bar (#2)Cover the microscope| Remarque |
|---|
| | Collect your samples, especially those in the microscopeLeave the microscope and workspace clean
| UI Expand |
|---|
| - Files can be saved temporarily (during acquisition) to local C: drive (desktop)
- At the end of each session, copy your data to your external drive and delete it from local C: drive
- You can store your files on the D: drive (Data Storage). If you do, please create one folder per laboratory using the principal investigator's last name. Inside, create a folder per user using the following nomenclature (First Name_Last Name).
| Remarque |
|---|
| In any case, do not store your files on the C: drive. |
| UI Expand |
|---|
| | Ancre |
|---|
FirstUse | FirstUse | When using the microscope for the first time, you need to import the microscope settings into the software. You will usually do this during the training session.
This procedure can also be performed if something is not working properly and if you want to reset the software to its original settings.| Remarque |
|---|
This process will delete all experiment protocols and reset the software to the original settings for this specific microscope. |
- If open, close NIS-Elements and wait until it is completely closed (up to 30 seconds)
- On your Desktop open the Softwares folder
- Open NIS Settings Utility
- Click on the Import tab
- Click on Browse
- Navigate to your Desktop
- Select the file Nikon-Ti2 Settings.bin
- Click Select
- Select all items
- Click Import
- Click OK
- Close the NIS Settings
- You can now reopen NIS-Elements
| | Tabs Page |
|---|
| id | Light path |
|---|
| title | Light path |
|---|
| The following schematics depict the light path for transmitted (bright-field and Phase Contrast) and reflected (fluorescence) lights.| PDF |
|---|
| name | LightPath_Nikon Ti2.pdf |
|---|
|
| Tabs Page |
|---|
| Available manuals| Tabs Page |
|---|
| | UI Expand |
|---|
| - Check condenser filters if labels match
- Check why 20x/0.75 DIC objective has no DIC prism
- Condenser DIC prism is DIC N1 while objective requires N2
- Check why at 4x Condenser gives a black shadow on the righ side of the image
- Adjust Objective XYZ offset
- Check plane because FOV is not flat
|
| UI Expand |
|---|
| expanded | true |
|---|
| title | 2023-11-29 |
|---|
| - Fixed condenser holder loose
- 20x/0.5 Ph1 dirty or damaged likely dirty with varnished
|
| UI Expand |
|---|
| - Added network cable between Acquisition and Processing workstations
- Added shortcuts in Desktop\Documentation
|
| UI Expand |
|---|
| - Clean 60x objective (nail polish on it !)
- Fix damaged stage insert
- Stage insert tilt adjustment
- Objective XY offset adjustments
|
| UI Expand |
|---|
| - Installed new objective 4x/0.2 Plan Apo Lambda
- Updated configuration file
|
| UI Expand |
|---|
| - Computer maintenance
- Imaging test slides
- Re-install DCAM API drivers v22.2.6391
- Okolab incubation complete maintenance
- Disassemble Okolab stage insert
- Disconnect the pipes
- Disconnect the Lauda water-bath
- Clean everything with 10% acetic acid (excepted the plastic pipes and washers)
- Rinse with regular tap water 2 times
- Rinse with distilled water once
- Dry, reassemble and reconnect
- Refill with the Lauda water-bath with 3L of milliQ water
- Set the Okolab temperature Control Mode to Chamber
- Set the Okolab temperature to 65°C
- Let run for 1h. This will sterilize the water.
- Check for any leakage
- Set the Okolab temperature Control Mode back to Sample
- Set the Okolab temperature back to 37°C
|
| UI Expand |
|---|
| - Cleaning objectives
- Control for incubation chamber liquid intrusion
|
| UI Expand |
|---|
| - CO2 Calibration for Okolab: Offset of 1%
|
| UI Expand |
|---|
| - 20x/0.75 DIC objective was dirty and has been cleaned
- Printed and displayed a Memo about available air and oil objectives
- Adjustment of camera angle
- Objective calibration
- Objective XY offset
- Updated NIS settings
- Added light path schematics to wikipedia
|
| UI Expand |
|---|
| - Added label on gas bottles
- Added line mark on humidifier
|
| UI Expand |
|---|
| - 512 GB SSD installed for OS
- Windows 10 Installation
- BIOS updated to v2.47
|
| Tabs Page |
|---|
| id | Technical Datasheet |
|---|
| title | Technical Datasheet |
|---|
| Stand- Nikon Ti2-E inverted Serial 540156 System 170110-Sys-006287
Light sources- Transmitted LED light
- ND32 filter
- IR filter
- Manual Polarizer
- Lumencor SpectraX 6-NII-SE Serial 9409
CondenserObjectives- 20x/0.5 Air Ph1 WD 2.1
- 60x/1.4 Oil DIC WD 0.13
- 100x/1.45 Oil Ph3 WD 0.13
- 100x/1.45 Oil DIC WD 0.13
- 4x/0.2 Air WD 20
- 20x/0.75 Air DIC WD 1.0
Stage- Motorized stage Ti2 SHU compatible Serial 127808
- Remote control joystick Ti2-S-JS Serial 127976
- Inserts
- Multi-well plate Ti2-S-HW with tilt adjustment (no incubation)
- Combo slide 3cm dish Ti2-S-HU with tilt adjustment (no incubation)
- Okolab H101-CellASIC Frame with perfusion ports
- 1 x 35mm petri dish 1x35-M + cover
- 2 Chamber Slide 2xGS-M+ cover
- 1 Multi-well for oil objectives MW-OIL
- 6-well plate 6MW+ cover
- 1 CellASIC + cover
Filters - DAPI Cube Ex 383-408 DAPI-U DM 425 BA 435-485
- GFP Cube Semrock 96372 M349727 17
- Cy5 Cube Semrock 96376 M351081 8
- 77074160 Custom Quad C182279 Polychroic and quad bandpass emitter for use with the following single bandpass filters: ET395/25x, ET470/24x, ET550/15x, ET640/30x
- DIC Analyser Ti2-C-DICACL
- C197767 7707\4656 CFP\YFP\mCherry XT
Detector- Hamamatsu ORCA Flash V2 C11440-22CU CMOS Monochrome Camera 2048 x 2048 pixels, 16-bit, 30fps at full resolution Serial 101081
Workstation- HP Z440 Workstation
- Intel Xeon E5-1620 v4 @ 3.5GHz
- RAM 32 GB DDR4 2400 MHz ECC (4 x 8 GB)
- OS 500 GB SSD 530 MB/s
- 4 TB HD Data Storage (2 x 2 TB spanned volume) 130 MB/s
- Video Card nVidia GTX 1080 8GB DDR5 dedicated memory
- Monitor HP Z24i display 24' 1920x1200
- Software NIS-Elements AR v5.02
Incubation- Okolab BoldLine Temperature unit Serial 284-1058 H101 T Unit BL
- Okolab BoldLine CO2/O2 Unit 0-10/1-18 Serial 088-1102
- Okolab OkoTouch Serial 118-224
- Lauda water-bath Model Eco RE415 S LCK 4910 Serial LCK-4910-16-0006 Okolab 1322-1006 2017-05-30
Consumables- CO2 Tank
- N2 Tank
- Liquid Light Guide
|
| Loading sample and focusing |
| Cette procédure permet de mettre le microscope dans une configuration sécuritaire et d'effectuer une calibration de la mise au point. À la fin de cette procédure le microscope sera prêt pour l'acquisition.
| UI Expand |
|---|
| title | Première mise au point |
|---|
| On the microscope touch screen : - Press sur Full Operation
Press 4x to select the 4x objective
| Info |
|---|
The 4x objective is the safest because it has the greatest working distance (16 mm).The sample will appear perfectly sharp long before the lens approaches it.It is recommended to always first focus with the safest lens.The objectives are para-focal, focusing with the safest objective will then allow you to easily find your sample with another objective. |
- Press Escape to raise the lenses to their highest position
Place the test slide on the microscope stage with the coverslip toward the objective | Remarque |
|---|
| Always use the test slide to perform the first focus. |
- If necessary, move the stage so that the sample is centered on the objective
On the computer Open the CellSens Dimension software Wait for the software to open (yes it's long...) At the bottom right of the window, select BF or the desired fluorescence (DAPI, FITC, TRITC or mCherry) to activate the configuration Adjust the focus with the main dial while looking through the eyepieces until the image is perfectly sharp
| Remarque |
|---|
The focus is around Z = 19000 um. The Z position value is visible on the touch screen. |
- At the bottom right of the window, select Off to turn off the illumination
|
| UI Expand |
|---|
|
| Avertissement |
|---|
| First focus with the safest lens before selecting another lens and continuing with secondary focus. |
| UI Expand |
|---|
| title | Focusing with air lenses |
|---|
| After performing the first focus, on the microscope touch screen: Press 10x, 20x or 40x to select the desired lens | Info |
|---|
The 40x objective is the best Air objective because it has the greatest number of optical corrections (Plan Apochromat) and the largest numerical aperture (0.95).It offers a lateral resolution of 420nm at a wavelength of 550nm. |
- At the bottom right of the window, select BF or the desired fluorescence (DAPI, FITC, TRITC or mCherry) to activate the configuration
Adjust the focus with the precision dial while looking through the eyepieces until the image is perfectly sharp - Select Off to turn off the illumination
- Your sample is ready for acquisition!
|
| UI Expand |
|---|
| title | Focusing with oil lenses |
|---|
| After performing the first focus, on the microscope touch screen: Press 60x Oil (1.35), 100x Oil (1.4) to select the desired lens.The microscope will automatically raise the objectives so that the sample is accessible. | Info |
|---|
The 100x objective is the best oil objective because it has the highest number of optical corrections (Plan Apochromat) and the largest numerical aperture (1.4).It offers a lateral resolution of 240nm at a wavelength of 550nm. |
- Place a drop of oil on your sample
In the CellSens Dimension software - Click OK
- At the bottom right of the window, select BF or the desired fluorescence (DAPI, FITC, TRITC or mCherry) to activate the configuration
- Adjust the focus with the precision dial while looking through the eyepieces until the image is perfectly sharp
- Select Off to turn off the illumination
- Your sample is ready for acquisition!
|
|
|
| UI Expand |
|---|
| - Files can be saved temporarily (during acquisition) to local C: drive (desktop)
- At the end of each session, copy your data to your external drive and delete it from local C: drive
- You can store your files on the D: drive (Data Storage). If you do, please create one folder per laboratory using the principal investigator's last name. Inside, create a folder per user using the following nomenclature (First Name_Last Name).
| Remarque |
|---|
| In any case, do not store your files on the C: drive. |
|
| UI Expand |
|---|
| - Save your data
- Close the software CellSens Dimension
- Transfer your data to the D: drive (Data Storage) or to your external drive and delete it from the local C: drive
- Turn off the computer
- If oil objectives were used, clean it with lens cleaner and lens paper (not Kimwipes)
- Turn off the microscope power bar (#2)
- Replace the dust cover on the microscope
| Remarque |
|---|
| - Collect your samples, especially those in the microscope
- Leave the microscope and workspace clean
|
|
|
| Tabs Page |
|---|
| id | Light path |
|---|
| title | Light path |
|---|
| The following schematics depict the light path for transmitted (bright-field and Phase Contrast) and reflected (fluorescence) lights.
|
| Tabs Page |
|---|
|
Available manuals
|
| Tabs Page |
|---|
|
| UI Expand |
|---|
| - Create BF light path
- Buy multi-bandpass filters
|
| UI Expand |
|---|
| - Complete installation setup
- Scrip for CellSens personalization
|
| UI Expand |
|---|
| - System relocated to Room 5308-2
- Added to Faces
- XCite NOVEM-S Installed
|
|
| Tabs Page |
|---|
| id | Technical Datasheet |
|---|
| title | Technical Datasheet |
|---|
| Stand- Olympus BX63 Serial 0G00080
CondenserCamera- Olympus DP80 Serial 8K48090
Stage- Motorized stage SHe Serial 127808
Workstation- HP Z4 Workstation
- Intel Xeon W-2102 @ 2.9GHz
- RAM 32 GB DDR4 2400 MHz
- OS 1 TB GB SSD 550 MB/s
- 2 TB HD Data Storage (2 x 1 TB spanned volume) 162 MB/s
- Video Card nVidia Quadro P620 2GB DDR5 dedicated memory
- Monitor Dell P2415Q display 24' 3840 x 2160
- Software CellSens Dimension v3.2
Consumables |
| Tabs Page |
|---|
| id | FAQ |
|---|
| title | Troubleshooting & FAQ |
|---|
| Troubleshooting| UI Expand |
|---|
| title | The microscope does not turn on, what should I do? |
|---|
| Please ensure that the microscope touchscreen is turned on. The switch is not easily accessible and is located on the back at the right of the touchscreen pad. |
FAQ| UI Expand |
|---|
| title | Can I use this microscope to look at cell in a dish? |
|---|
| No. This is an upright microscope designed to look at specimen mounted between a slide and a coverslip |
| | Tabs Page |
|---|
| id | FAQ |
|---|
| title | Troubleshooting & FAQ |
|---|
| Troubleshooting| UI Expand |
|---|
| | title | Chamber does not reach the desired temperature (or is very slow to warm up) |
|---|
| This can happen when the liquid running through the chamber is not flowing properly. - Pause your experiment
- Turn off the Okolab environment controller 3A and 3B
- Disconnect the blue end of the connection pipe (at the junction with the spring shape objective warmer)
- Place the open end into a dish to collect liquid
- Turn the Lauda water bath back ON (3B)
- The liquid should flow quite rapidly, if not proceed as follow
- Turn OFF the Lauda water bath (3B)
- Take the 20 mL syringe located inside the drawer labelled Tubing
- Connect it to the open end of the blue pipe
- Use the syringe to blow pressurized air into the pipes to clear it out
- Remove the syringe (and store it back into the Tubing drawer)
- Test if the liquid is now flowing properly by turning the Lauda water bath back ON (3B)
- If not repeat the procedure
- If so, turn OFF the Lauda water-bath (3B)
- Reconnect the blue and green pipes together
- Turn the Okolab environment controller 3A and 3B back ON
| Avertissement |
|---|
Be careful not to touch your sample when performing these actions as it may displace your current acquisition |
| Info |
|---|
| title | How the Okolab chamber works |
|---|
| The liquid from the water bath enters the lead first via the red pipe - Then it goes through the lead circuitry to keep it warm
- It exists via the unlabeled tube and enters the incubation chamber main body
- It goes through the circuitry of the main body and exits via the green labelled tube
One must maintain a decent amount of liquid in the Lauda water bath to avoid bubble formation in the circuitry Because the circuitry inside the top lead and the incubation chamber main body is thin it can get clogged. The procedure above can solve this issue. | UI Expand |
|---|
| title | Liquid forming inside the incubation chamber |
|---|
| This happens when the mixed-gas humidifier is overfilled. Bubbles created by the gas going through the humidifier can bring liquid into the gas feed line. - Turn off the Okolab module and the water bath
- Remove your sample and store it properly
- Dry the incubation chamber with a clean tissue
- Carefully remove the cap of the humidifier glass bottle
| Avertissement |
|---|
Pay extra care when manipulating the humidifier bottle as it is made of glass and is very fragile |
- Remove distilled water from the humidifier
| Info |
|---|
Humidifier shouldn't be more than 2/3rd filled |
- Close the humidifier by replacing the cap
- Turn on the Okolab module and the water bath
| UI Expand |
|---|
| title | Liquid forming inside the incubation chamber but the humidifier is not overfilled |
|---|
| This can happen during long experiments. The high humidity of the gas mixture condensates in the pipe between the humidifier and the incubation chamber. - Pause your experiment
- Disconnect both ends of the yellow tube from the humidifier
- Drain the tube from any liquid
- Reconnect the yellow tube to the humidifier
- You can use a syringe or gas pressure to blow out any liquid from the incubation chamber cover
| Avertissement |
|---|
Be careful not to touch your sample when performing this action |
- Wipe any liquid with a tissue
- Reconnect the yellow tube to the incubation chamber
|
FAQ| UI Expand |
|---|
| title | Can I use this microscope to look at cell in a dish? |
|---|
| - Yes. This is an inverted microscope designed to look at specimen in a dish or a multi-well plate
- The objectives are optimized to image through thin glass bottom multi-well plates
- You may also image specimen mounted between a slide and a 0.17mm thick coverslip
- For long timelapse, be aware of photo-toxicity
|
| UI Expand |
|---|
| title | How can I warm up the incubation chamber faster? |
|---|
| You may use a trick to warmup the incubation chamber faster. Using this method. you should reach a stable temperature within 30 minutes. | Avertissement |
|---|
Do NOT proceed with your sample but with a blank control (dish with distilled water for example) |
- Place your blank control in the incubation chamber
- Immerge the tip of the sample temperature probe in the blank
- Set the Okolab temperature Control Mode to Chamber (Settings>Temperature>Control Mode>Chamber>Save)
- Set the Okolab temperature to 50°C (Home>Temperature>50°C>Set)
- Check the temperature of the sample (Menu Magnifier>Sample Temperature). It should take between 10 to 15 minutes for the blank to reach 30°C.
| Info |
|---|
The Lauda water bath is faster to warm up water than to cool it down. Make sure to anticipate and not pass beyond the desired temperature.
If your desired temperature is 37°C, you can stop the procedure when the blank has reached 30°C. |
When the blank has reach the desired temperature Set the Okolab temperature back to 37°C (Home>Temperature>37°C>Set)Set the Okolab temperature Control Mode to Sample (Settings>Temperature>Control Mode>Sample>Save)Wait 10 to 20 minutes until the temperature stabilizesThen you can safely replace the blank with your sample |
|
