| Tabs Page |
|---|
| id | Description |
|---|
| title | Description |
|---|
| Olympus BX63 upright microscopeP-G Desmarais Building, Room 5308-2
Advanced Microscope Tier 1 usage price Instrument awarded to Dr Marina Martinez by the Canadian Foundation for Innovation (CFI)
Applications - Transmitted light, Bright-field
- Polarized light, DIC
Fluorescence - Color camera
Light sources
| Développer |
|---|
| title | X-Cite NOVEM XT910 complete specifications |
|---|
|
| Source | Excitation wavelengths (nm) | Compatible fluorophores | Nominal power (mW) |
|---|
| 365 |
| DAPI, Hoechst |
| | 435 |
| CFP |
| | 475 |
| FITC, GFP |
| | 500-600 | -
[500-600] |
|
| 509/22
[498-520] | YFP |
| 554/23
[542-565] | TRITC |
| 578/21
[567-588] | mCherry |
| | 635 |
| Cy5
|
| 735 |
| Cy7 |
|
|
Objectives 4x/0.16 Air WD 16 10x/0.4 Air WD 3.1 20x/0.75 Air WD 0.6 40x/0.95 Air WD 0.18 60x/1.35 Oil WD 0.15 100x/1.4 Oil WD 0.13 Empty
| Développer |
|---|
| title | Objectives complete specifications |
|---|
|
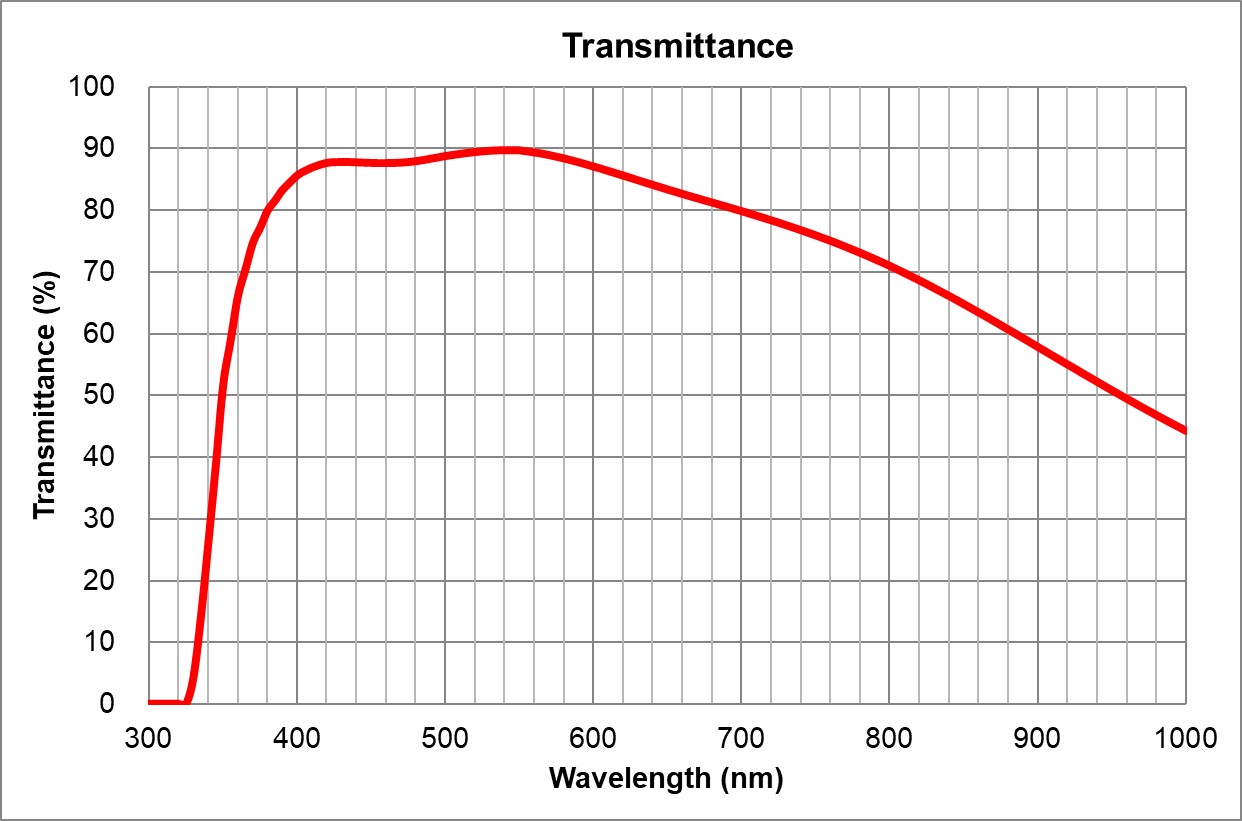
| Position | Nom | Marque | Nom complet | Identifiant | Ouverture numérique | Immersion | Distance de travail (mm) | Transmittance
(% [nm]) | Technique | Épaisseur du couvre-objet (mm) |
|---|
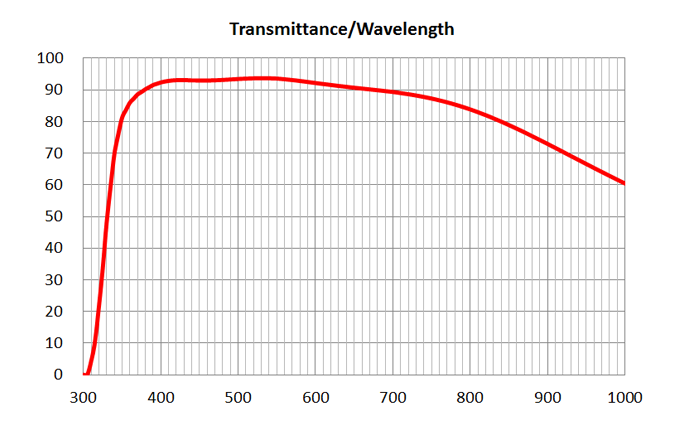
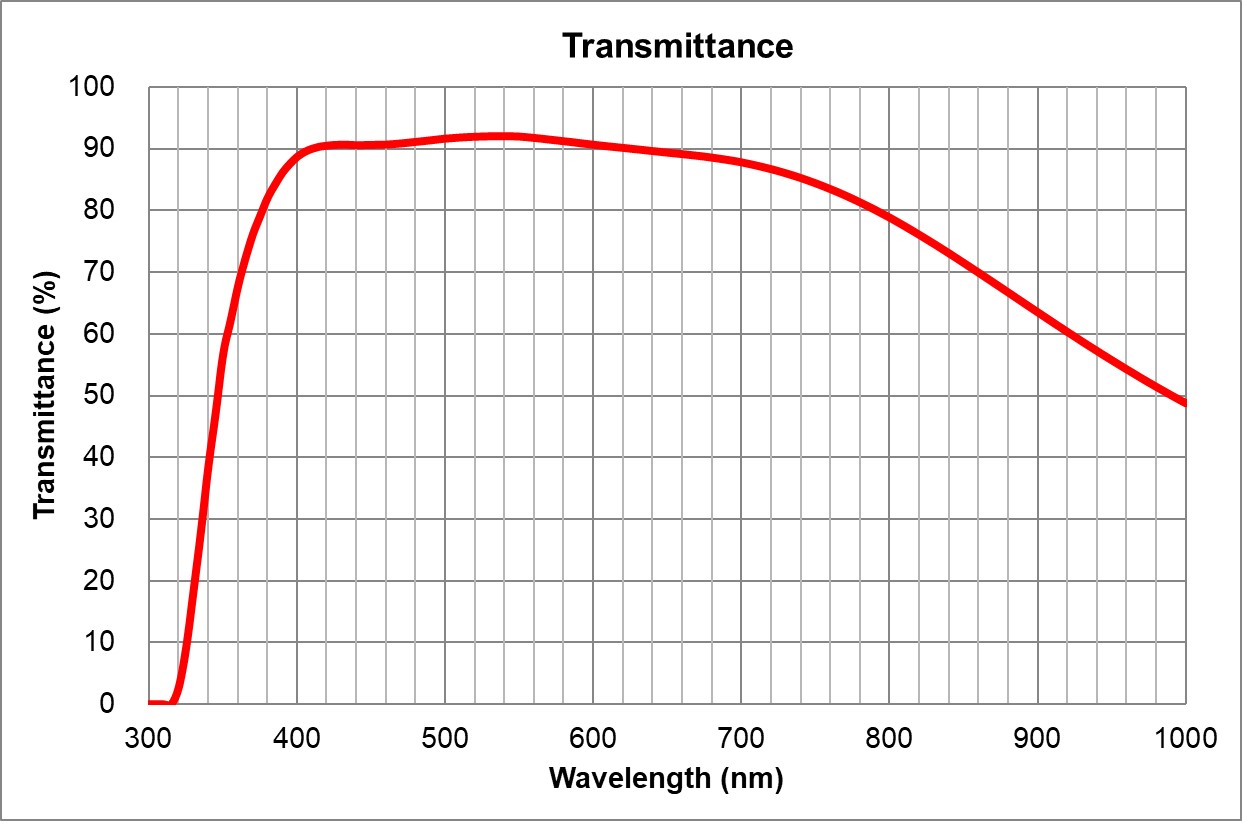
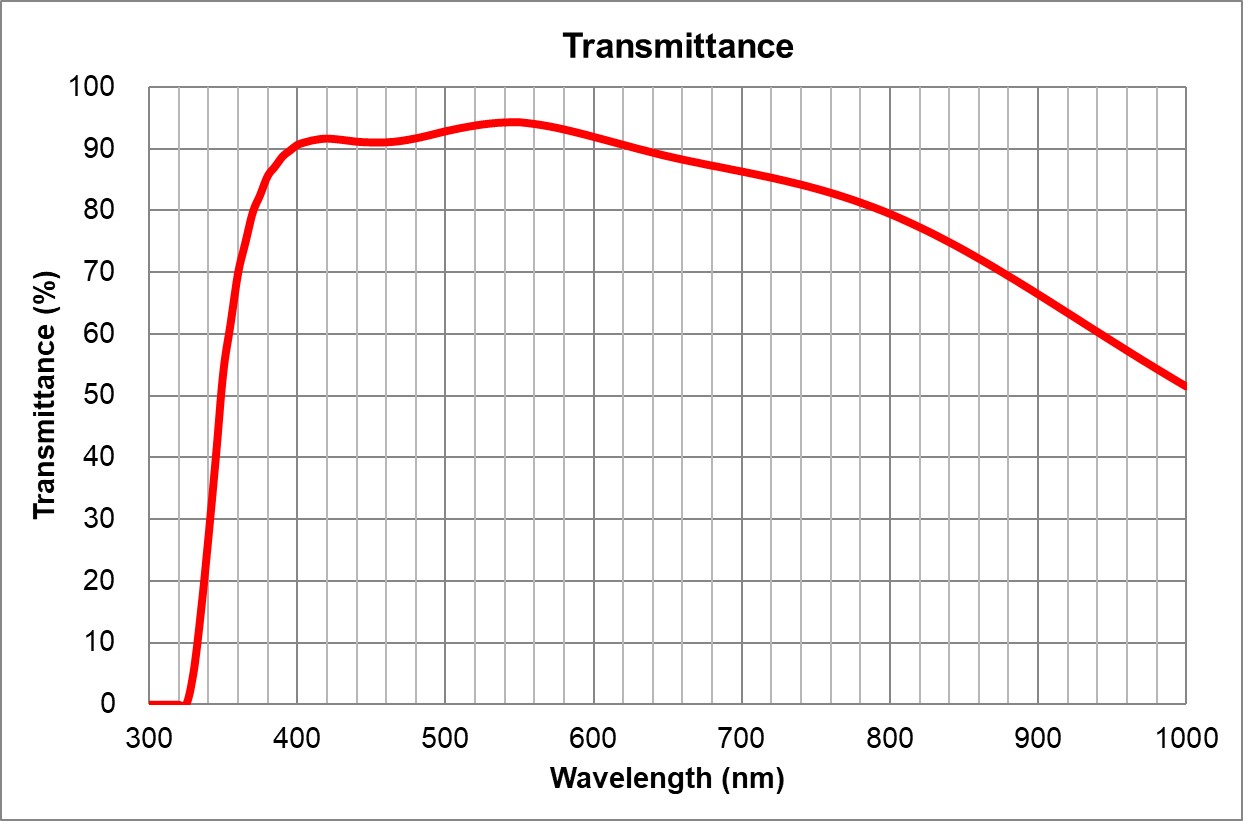
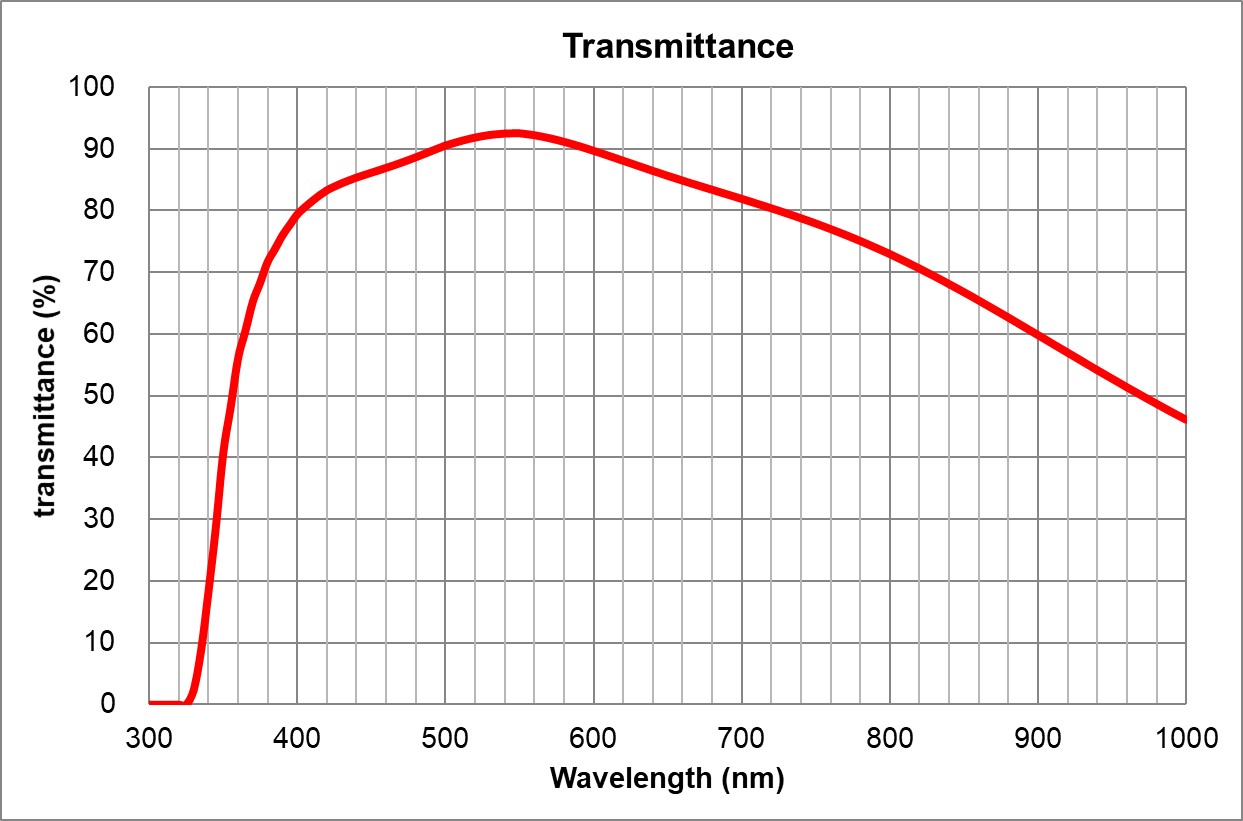
| 1 | 4x/0.16 Air | Olympus | 4x/0.16 Air UPlanSApo | | 0.16 | Air | 16 | >90% at 550nm
 | BF, Fluo | - | | 2 | 10x/0.4 Air | Olympus | 10x/0.4 Air
UPlanSApo | UPLXAPO10X.pdf | 0.4 | Air | 3.1 | ~90% at 550nm
 | BF, Pol, DIC, Fluo | 0.17 | | 3 | | Olympus | 20x/0.75 Air
UPlanSApo | | 0.75 | | 0.6 | >90% at 550nm
 | BF, Pol, DIC, Fluo | 0.17 | | 4 | 40x/0.95 Air | Olympus | 40x/0.95 Air
UPlanSApo | | 0.95 | Air | 0.18 | ~90% at 550nm
 | BF, Pol, DIC, Fluo | Adjustable 0.11-0.23 | | 5 | 60x/1.35 Oil | Olympus | 60x/1.35 Oil
UPlanSApo | | 1.35 | | 0.15 | ~90% at 550nm
 | BF, Pol, DIC, Fluo | 0.17 | | 6 | | Olympus | 100x/1.4 Oil
UPlanSApo | | 1.4 | | 0.13 | ~90% at 550nm
 | BF, Pol, DIC, Fluo | 0.17 | | 7 | |
|
|
|
| |
|
|
|
|
BF: Bright-field
Pol: Polarized light
DIC: Differential interference contrast
Fluo: Fluorescence |
Filters - Empty
- DAPI
- FITC
- TRITC
- mCherry
- Empty
- Empty
- U-FDICT DIC Analyzer (Nomarski prism)
| Développer |
|---|
| title | Filters complete specifications |
|---|
|
| Position | Name | Brand | ID | Excitation Filter | Dichroic mirror | Emission Filter | Comments |
|---|
| 1 | Empty |
|
|
|
|
|
| | 2 | DAPI | Olympus | U-FUNA | 360-370 | 410LP | 420-460 | | | 3 | FITC | Olympus | U-FBNA | 470-495 | 505LP | 510-550 | | | 4 | TRITC | Olympus | U-FGWA | 530-550 | 570LP | 575-625 | | | 5 | mCherry | Olympus | U-FYW | 540-585 | 595LP | 600LP | | | 6 | Empty |
|
|
|
|
|
| | 7 | Empty |
|
|
|
|
|
| | 8 | DIC Analyzer | Olympus | U-FDICT DIC | - | - | - | DIC Analyzer |
|
Detector Olympus DP80 Dual sensors (color and monochrome) CCD camera, 6.45 x 6.45 um pixel size,15 images/s at full frame 55% QE at 550nm
Color mode 4080 x 3072 pixels, 24-bit
Monochrome mode 1360 x 1024 pixels, 14-bit
Olympus_DP80 Camera_User Guide.pdf
|
| Tabs Page |
|---|
| id | User Guide |
|---|
| title | User Guide |
|---|
|
| UI Expand |
|---|
| - Remove the dust cover from the microscope
- Turn on the computer (#1)
- Turn on the microscope power bar(#2)
Turn on the microscope touchscreen (switch is located at the back on the right of the touch screen) (#3) Use your UdeM credentials to log in to Windows | Info |
|---|
The first time you use the instrument, you need to import the microscope settings into the software. To do this follow the instructions in the First use section below. |
- Start the software CellSens Dimension
|
| UI Expand |
|---|
| When using the microscope for the first time, you need to import the microscope settings into the software. You will usually do this during the training session.
This procedure can also be performed if something is not working properly and if you want to reset the software to its original settings. | Remarque |
|---|
This process will delete all experiment protocols and reset the software to the original settings for this specific microscope. |
- If open, close the software CellSens Dimension and wait until it is completely closed (up to 30 seconds)
- On your Desktop open the folder Documentation
- Double-click Settings for BX-63
- A script will run and a black window will briefly appear
- You can now reopen the software CellSens Dimension
|
| UI Expand |
|---|
| title | Loading sample and focusing |
|---|
| Cette procédure permet de mettre le microscope dans une configuration sécuritaire et d'effectuer une calibration de la mise au point. À la fin de cette procédure le microscope sera prêt pour l'acquisition.
| UI Expand |
|---|
| title | Première mise au point |
|---|
| On the microscope touch screen : - Press sur Full Operation
Press 4x to select the 4x objective
| Info |
|---|
The 4x objective is the safest because it has the greatest working distance (16 mm).The sample will appear perfectly sharp long before the lens approaches it.It is recommended to always first focus with the safest lens.The objectives are para-focal, focusing with the safest objective will then allow you to easily find your sample with another objective. |
- Press Escape to raise the lenses to their highest position
Place the test slide on the microscope stage with the coverslip toward the objective | Remarque |
|---|
| Always use the test slide to perform the first focus. |
- If necessary, move the stage so that the sample is centered on the objective
On the computer Open the CellSens Dimension software Wait for the software to open (yes it's long...) At the bottom right of the window, select BF or the desired fluorescence (DAPI, FITC, TRITC or mCherry) to activate the configuration Adjust the focus with the main dial while looking through the eyepieces until the image is perfectly sharp
| Remarque |
|---|
The focus is around Z = 19000 um. The Z position value is visible on the touch screen. |
- At the bottom right of the window, select Off to turn off the illumination
|
| UI Expand |
|---|
|
| Avertissement |
|---|
| First focus with the safest lens before selecting another lens and continuing with secondary focus. |
| UI Expand |
|---|
| title | Focusing with air lenses |
|---|
| After performing the first focus, on the microscope touch screen: Press 10x, 20x or 40x to select the desired lens | Info |
|---|
The 40x objective is the best Air objective because it has the greatest number of optical corrections (Plan Apochromat) and the largest numerical aperture (0.95).It offers a lateral resolution of 420nm at a wavelength of 550nm. |
- At the bottom right of the window, select BF or the desired fluorescence (DAPI, FITC, TRITC or mCherry) to activate the configuration
Adjust the focus with the precision dial while looking through the eyepieces until the image is perfectly sharp - Select Off to turn off the illumination
- Your sample is ready for acquisition!
|
| UI Expand |
|---|
| title | Focusing with oil lenses |
|---|
| After performing the first focus, on the microscope touch screen: Press 60x Oil (1.35), 100x Oil (1.4) to select the desired lens.The microscope will automatically raise the objectives so that the sample is accessible. | Info |
|---|
The 100x objective is the best oil objective because it has the highest number of optical corrections (Plan Apochromat) and the largest numerical aperture (1.4).It offers a lateral resolution of 240nm at a wavelength of 550nm. |
- Place a drop of oil on your sample
In the CellSens Dimension software - Click OK
- At the bottom right of the window, select BF or the desired fluorescence (DAPI, FITC, TRITC or mCherry) to activate the configuration
- Adjust the focus with the precision dial while looking through the eyepieces until the image is perfectly sharp
- Select Off to turn off the illumination
- Your sample is ready for acquisition!
|
|
|
| UI Expand |
|---|
| - Files can be saved temporarily (during acquisition) to local C: drive (desktop)
- At the end of each session, copy your data to your external drive and delete it from local C: drive
- You can store your files on the D: drive (Data Storage). If you do, please create one folder per laboratory using the principal investigator's last name. Inside, create a folder per user using the following nomenclature (First Name_Last Name).
| Remarque |
|---|
| In any case, do not store your files on the C: drive. |
|
| UI Expand |
|---|
| - Save your data
- Close the software CellSens Dimension
- Transfer your data to the D: drive (Data Storage) or to your external drive and delete it from the local C: drive
- Turn off the computer
- If oil objectives were used, clean it with lens cleaner and lens paper (not Kimwipes)
- Turn off the microscope power bar (#2)
- Replace the dust cover on the microscope
| Remarque |
|---|
| - Collect your samples, especially those in the microscope
- Leave the microscope and workspace clean
|
|
|
| Tabs Page |
|---|
| id | Light path |
|---|
| title | Light path |
|---|
| The following schematics depict the light path for transmitted (bright-field and Phase Contrast) and reflected (fluorescence) lights.
|
| Tabs Page |
|---|
|
Available manuals
|
| Tabs Page |
|---|
|
| UI Expand |
|---|
| - Create BF light path
- Buy multi-bandpass filters
|
| UI Expand |
|---|
| - Complete installation setup
- Scrip for CellSens personalization
|
| UI Expand |
|---|
| - System relocated to Room 5308-2
- Added to Faces
- XCite NOVEM-S Installed
|
|
| Tabs Page |
|---|
| id | Technical Datasheet |
|---|
| title | Technical Datasheet |
|---|
| Stand- Olympus BX63 Serial 0G00080
CondenserCamera- Olympus DP80 Serial 8K48090
Stage- Motorized stage SHe Serial 127808
Workstation- HP Z4 Workstation
- Intel Xeon W-2102 @ 2.9GHz
- RAM 32 GB DDR4 2400 MHz
- OS 1 TB GB SSD 550 MB/s
- 2 TB HD Data Storage (2 x 1 TB spanned volume) 162 MB/s
- Video Card nVidia Quadro P620 2GB DDR5 dedicated memory
- Monitor Dell P2415Q display 24' 3840 x 2160
- Software CellSens Dimension v3.2
Consumables |
| Tabs Page |
|---|
| id | FAQ |
|---|
| title | Troubleshooting & FAQ |
|---|
| Troubleshooting| UI Expand |
|---|
| title | The microscope does not turn on, what should I do? |
|---|
| Please ensure that the microscope touchscreen is turned on. The switch is not easily accessible and is located on the back at the right of the touchscreen pad. |
FAQ| UI Expand |
|---|
| title | Can I use this microscope to look at cell in a dish? |
|---|
| No. This is an upright microscope designed to look at specimen mounted between a slide and a coverslip |
|
|


