- Created by Nicolas Stifani, last modified by Emmanuel Bajon on Jul 18, 2024
You are viewing an old version of this page. View the current version.
Compare with Current View Page History
« Previous Version 15 Next »
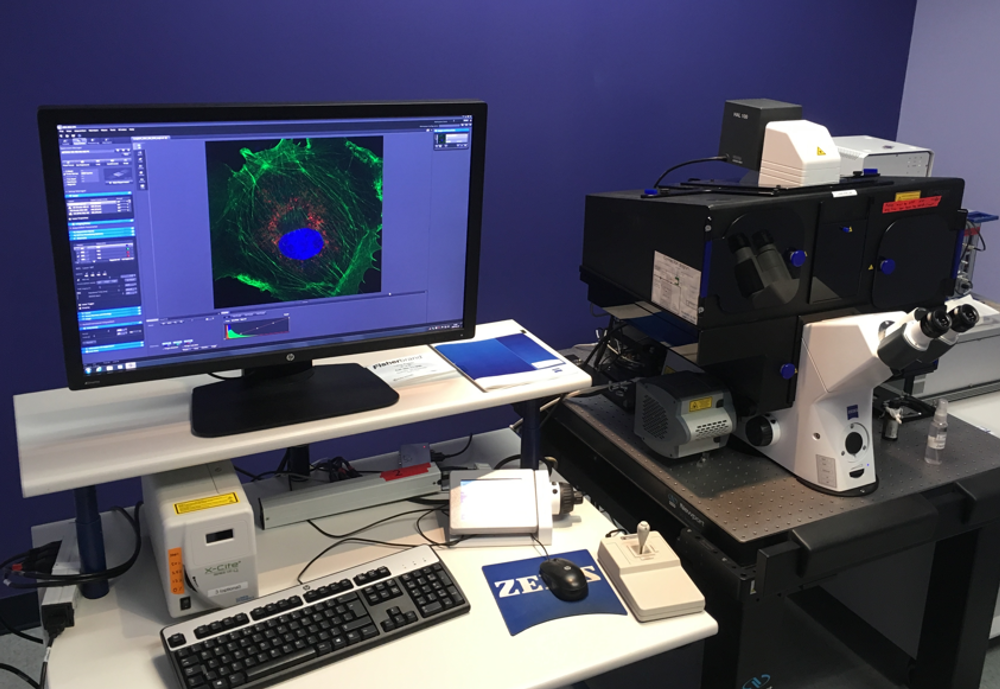
Zeiss Elyra PS.1 structured illumination microscope
J-A Bombardier Building, Room 3223-03
Advanced Microscope Tier 2 usage price
Instrument awarded to Dr. Daniel Zenklusen and Pascal Chartrand by the Canadian Foundation for Innovation (CFI)
- Applications
- Fluorescence
- Super-resolution
Light sources
halogen lamp for transmitted light
X-Cite Xylis for visible fluorescence
X-Cite Xylis
This illumination mode only works to localize samples - NOT for acquisition4 lasers 405, 488 561 638
Emission peak (nm)
Nominal Output Power (mW)
Power at sample plane in mW (2024/07/15)
SIM mode
Power at sample plane in mW (2024/07/15)
TIRF mode (WF-EPI)
405
50
2.15
3.6
488
100
5.52
7.7
561
100
7.9
10.3
639
100
2.64
3.2
Objectives
10x/0.30 Air WD 5.30
63x/1.40 Oil WD 0.19
- Empty
Position | Nom | Marque | Nom complet | Identifiant | Grossissement | Ouverture numérique | Immersion | Type | Distance de travail (mm) | Transmittance (% [nm]) | Technique | Épaisseur du couvre-objet (mm) |
---|---|---|---|---|---|---|---|---|---|---|---|---|
1 | 10x/0.30 | Zeiss | 10x/0.3 DIC I EC Plan-Neo Fluar M27 | 10x | 0.3 | Air | Plan Neofluar | 5.2 | BF, DIC, Fluo | 0.17 | ||
4 | 63x/1.40 Huile | Zeiss | 63x/1.4 DIC III Plan-Apochromat M27 | 63x | 1.4 | Huile | Plan Apochromat | 0.19 | BF, DIC, Fluo | 0.17 |
BF: Bright-field
DIC: Interference contrast
- Filter cubes
- Transmitted light
- Filter set 77 HE (GFP/Cy3.5/Cy5)
- BP420-490 + LP750
- LP 570
- BP490-520 + LP750
- LP640
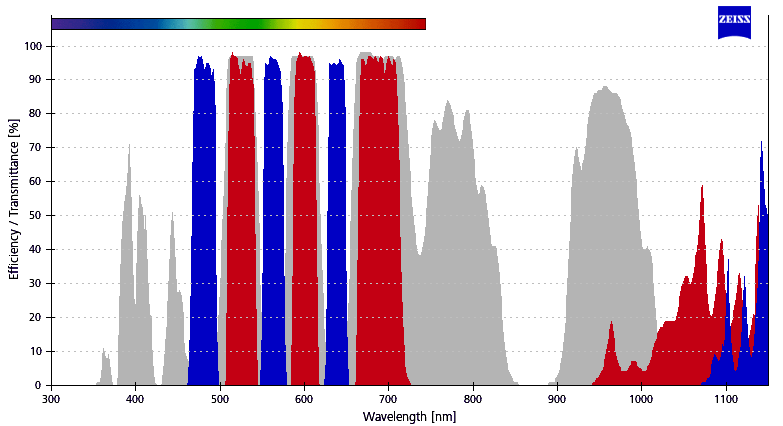
Position | Name | Brand | ID | Excitation filter | Dichroic mirror | Emission filter | Filter spectra | Fluorophore examples |
---|---|---|---|---|---|---|---|---|
1 | Transmitted light | Zeiss | ||||||
2 | Zeiss | 489077-0000-000 | TBP 483 + 564 + 642 (HE) | TFT 506 + 582 + 659 (HE) | TBP 526 + 601 + 688 (HE) | GFP, FITC, Alexa488, Cy3.5, DsRed, Calcium Orange, mCherry, Cy5, Alexa647 | ||
3 | BP420-490 + LP750 | Zeiss | ||||||
4 | LP 570 | Zeiss | ||||||
5 | BP490-520 + LP750 | Zeiss | ||||||
6 | LP640 | Chroma | 546/11 |
- Detector
- TV1 for PALM/STORM (side port): EMCCD iXon EM+ DU-897D-CS0-#BV-462 (Andor)
- Back illuminated, >90% QE; single photon detection
- 512x512, 16 µm pixels (i.e. 1 pixel = 266 nm2 of the sample when using the 63x Objective and 1x adapter), 35 fps (full chip) to hundreds fps (cropped chip)
- 14 bits; 10, 5, 3 et 1 MHz
- Cooled to -80oC, Readout noise 49 e- @ 10 MHz or 32 e- @ 3 MHz
TV2 for SR-SIM (bottom port) : EMCCD iXon3 DU-885K CSO VP461 (Andor)
- Quantum Efficiency: 50-65% between 400nm and 750nm
- Full chip acquisition: 1004x1002, 8 µm pixels (i.e. 1 pixel = 133 nm2 of the sample when using the 63x Objective and 1x adapter), 31 fps (full chip) à 13 812 fps
- Picture after SIM reconstruction: 1904x1900 px
- 14 bits; 35, 27 et 13 MHz
- Cooled to -80oC, Readout noise 25 e- @ 35 MHz or 12 e- @ 13 MHz
- TV1 for PALM/STORM (side port): EMCCD iXon EM+ DU-897D-CS0-#BV-462 (Andor)
- Turn on the computer (#1)
Turn on the microscope power bar on the left of the microscope (#2)
Turn on the microscope power bar on the right of the microscope (#3)
Use your UdeM credentials to log in to Windows
When using for the first time, it is necessary to import the microscope-specific parameters BEFORE starting the software. See the First Use section below.
Start the Zen Black software
When using for the first time, it is necessary to import the microscope-specific parameters into the software. This procedure is usually carried out during the training session. However, it is also possible to use it to reset the software if it is not displayed correctly, for example.
Please note, this procedure will delete all your experiment protocols and restore the software to its original settings.
- If open, close the Zen Black software and wait for it to close completely (up to 30 seconds)
- On the Desktop open the Documentation folder
- Double-click Settings for Zeiss Elyra
- Click Yes
- Click OK
- A script will run and a black window will appear briefly
- You can then reopen the Zen Black software
This procedure puts the microscope in a safe configuration and performs a focus calibration. At the end of this procedure the microscope will be ready for acquisition.
On the microscope touch screen:
- Press Home>Load Position to lower the stage to its lowest position
- Press Set Work Position to store this position
- If necessary, move the focus slightly up to remove the “Lower Z limit reached” message displayed on the touchscreen
- Press Home>Microscope>Turret>Objectives>10x to select the 10x objective
- If asked, tap Done to remove the oil lens cleaning warning
- Press Home>Microscope>XYZ>Position>Z-Position>Set zero>Auto to perform focus calibration
- Press OK to start the focus calibration procedure
- Wait a few seconds for the calibration to be completed
Once calibrated, the focus can be found Z=1.7 mm for the adjustable insert and Z=3.1 mm for simple inserts. The Z value can be found on the microscope touch screen Home>Z-Position
Make sure to calibrate the focus before performing the first focus.
On the microscope touch screen:
- Press Home>Microscope>Turret>Objectives
- Press 10x to select the 10x lens
The 10x objective is the safest because it has the longest working distance (5.3 mm). The sample will appear perfectly sharp long before the lens approaches it. It is recommended to always first focus with the safest lens. The objectives are para-focal, focusing with the safest objective will then allow you to easily find your sample with another objective.
- Press Home>Load Position to lower the stage to its lowest position
- Press Set Work Position to store this position
- If necessary, move the focus slightly up to remove the “Lower Z limit reached” message displayed on the touchscreen
Select one of the 3 available insert: i) Petri, ii) Slide ou iii) Combo with tilt adjustment
- Place the test slide in the insert with the coverslip toward the objective
Always use the test slide to perform the first focus.
- Place the insert on the microscope stage
- If necessary, move the stage so that the sample is centered on the objective
On the computer:
- Open the Zen Black software
- In the Locate tab, select BF visible or Fluo visible to activate the configuration
- Adjust the focus with the main dial while looking through the eyepieces until the image is perfectly sharp
Once calibrated, the focus can be found Z=1.7 mm for the adjustable insert and Z=3.1 mm for simple inserts. The Z value can be found on the microscope touch screen Home>Z-Position
- In the Locate tab, select Off to turn off the illumination
Important
First focus with the safest lens before selecting another lens and continuing with secondary focus.
This microscope does not have additional air objectives. However, if there were, the procedure would be as follows:
After performing the first focus, on the microscope touch screen:
- Press Home>Microscope>Turret>Objectives
- Press on the desired lens
In Zen Black software:
- In the Locate tab, select BF visible or Fluo visible to activate the configuration
- Adjust the focus with the precision dial while looking through the eyepieces until the image is perfectly sharp
- In the Locate tab, select Off to turn the illumination off
- Your sample is ready for acquisition!
After performing the first focus, on the microscope touch screen:
- Press Home>Microscope>Turret>Objectives
Press 63x Oil (1.4) to select the 63x lens. The microscope will automatically lower the stage so that the sample is accessible.
- Remove the insert from the microscope stage
- Place a drop of oil on the objective
- Replace the insert on the microscope stage
- Press Done. The microscope will automatically return the sample to its original position
In Zen Black software:
- In the Locate tab, select BF visible or Fluo visible to activate the configuration
- Adjust the focus with the precision dial while looking through the eyepieces until the image is perfectly sharp
- In the Locate tab, select Off to turn the illumination off
- Your sample is ready for acquisition!
- Files can be saved temporarily (during acquisition) on the local C: drive (desktop)
- At the end of each session, copy your data to your external drive and delete it from the local C: drive
- You can store your files on the D: drive (Data Storage). If you do, please create a folder per laboratory using the principal investigator last name. Within, create one folder per user (Firstname_Lastname).
In any case, your files should be removed from the C: drive.
- Save your data
- Close the software Zen Black
- Transfer your data to the D: drive (Data Storage) or to your external drive and delete it from the local C: drive
- Clean oil lenses with lens cleaner and paper
Turn off the microscope power bar on the right of the microscope (#3)
- Turn off the camera and laser power bar on the left of the microscope (#2)
- Turn off the computer
Important Reminders
- Take back your samples including ones in the microscope
- Leave the microscope and the working area clean
Stand
- Zeiss AxioObserver Z1 upright Serial:
Part Number:
System ID Camera adapter Model 60N-C, 1", 1x, Model: 426114
Motorized Neutral density filters for transmitted light
Manual Field diaphragm for transmitted light
- Manual polarizer
- Left imaging port with manual splitter camera adapter Model 60N-C, 1", 1x, Model: 426114
- Trinocular with 100% ocular 40% occular/70% camera and 100% manual splitter
- 3mm liquid light guide #805-0038
- Zeiss 423302-0000 Collimator
- Motorized Aperture diaphragm
- Motorized Fluorescence field diaphragm
Light sources
- Transmitted Halogen light 12V 100W HAL 100 #423000
Condenser
- Motorized condenser #424201-9902
Lens NA 0.9 WD TBD Part Number: TBD
- Manual polarizer
Filter turret 6 positions manual
Objectives
10x/0.30 Air WD 5.30 DIC I Plan-NeoFluar M27 420340-9901-000
63x/1.40 Oil WD 0.19 DIC III Plan-Apochromat M27 420782-9900-000
100x/1.40 Oil WD 0.17 DIC III Plan-Apochromat M27 420792-9900-000
Stage
- Motorized stage Zeiss AIM System #2502000124
- Remote control joystick
- Inserts
- Slide only
- Plate
Filters
10-positions motorized filter wheel #
- DAPI Zeiss Filter Set 49 cube 424933
Detector
- 2 camera Evolve 512 Serial
Workstation
- HP Z800 Workstation Serial: CZC1473Y0Q Part number: WJ112ECJ#AK6
- 2 x Intel Xeon X5650 2.66 GHz
- RAM 24 GB DDR3 1333 MHz ECC (12 x 2 GB)
- OS 500 GB SSD 410 MB/s
- 2 TB HD Data Storage (2 x 1 TB spanned volume) 110 MB/s
- Video Card ATI FirePro V5800 1 GB DDR5
- Monitor Dell ST2410 24' 1920 x 1080
- Software Zen Blue 2.6 Hotfix 12
Incubation
- Zeiss Incubation
Consumables
- 3mm liquid light guide THorlabs
- 12V 100W halogen lamp OSRAM XenoPhot #64623 HLX
Troubleshooting
The best way to solve a problem in Microscopy is to follow the light path. You will find in the Light path tab of this page, the diagrams which will allow you to follow the light all along its path through the microscope.
- Open the light path file
- Starting from the light source and moving towards the detector, verify that there is indeed light after each component of the microscope
FAQ
Yes. It is an inverted microscope designed for the observation of living specimens. The spinning disk is particularly appreciated for its limited phototoxicity. This is an inverted microscope designed to look at specimen in a dish or a multi-well plate. The objectives are optimized to image through thin glass bottom multi-well plates. You may also image specimen mounted between a slide and a 0.17mm thick coverslip.
- No labels