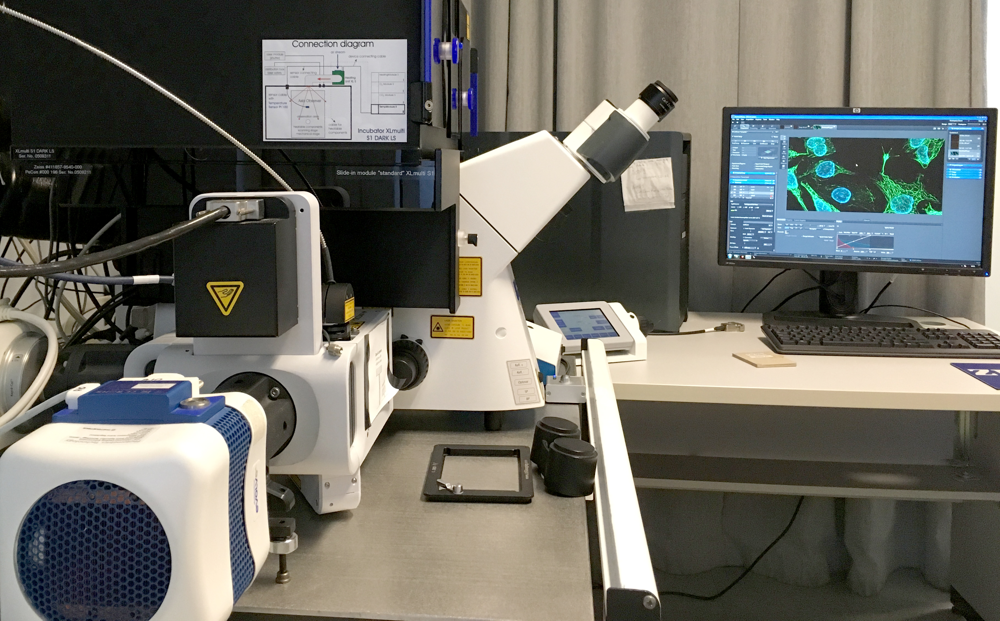
Zeiss Axio-Observer spinning-disk microscope

J-A Bombardier Building, Room 3223-01
Advanced Microscope Tier 2 usage price

Instrument awarded to Dr. Daniel Zenklusen by the Canadian Foundation for Innovation (CFI)

  • Applications
    • Transmitted light
    • Interference Contrast (DIC)
    • Fluorescence
  • Light sources

    • 12V 100W halogen lamp for transmitted light

    • Lumencor SOLA for visible fluorescence

      Emission peak (nm)

      Power (mW)

      334

      5

      365

      20

      405

      19

      436

      22

      546

      21

      579

      18


    •  4 lasers 405, 488 561 638

      Laser line (nm)

      Nominal Power (mW)

      405

      50

      488

      100

      561

      50

      639

      50

  • Objectives

  1. 100x/1.46 Oil WD 0.11

  2. TIRF Divergence adjusting aid

  3. TIRF Angle adjusting aid 
  4. 63x/1.46 Oil WD 0.1

  5. 10x/0.3 Air WD 5.2

  6. Empty

    Position

    Nom

    Marque

    Nom complet

    Identifiant

    Grossissement

    Ouverture numérique

    Immersion

    Type

    Distance de travail (mm)

    Transmittance

    (% [nm])

    Technique

    Épaisseur du couvre-objet (mm)

    1

    100x/1.46 Oil

    Zeiss

    100x/1.46 DIC I

    Alpha Plan-ApoChromat

    M27

    420792-9800

    100x

    1.46

    Oil

    Plan Apochromat

    0.11

    >70% [410-800]

    BF, DIC, Fluo

    0.17

    2

    TIRF Divergence adjusting aid

    Zeiss


    423682-8801-000


    3

    TIRF Angle adjusting aid

    Zeiss


    423682-8802-000


    4

    63x/1.46 Oil

    Zeiss

    63x/1.46 DIC III

    Alpha Plan-Apochromat
    Korr TIRF

    M27

    420780-9970-000

    63x

    1.46

    Huile

    Plan Apochromat

    0.10

    >80% [500-800]

    BF, DIC, Fluo

    0.15-0.19

    5

    10x/0.3 Air

    Zeiss

    10x/0.3 
    EC Plan-NeoFluar

    420340-9901

    10x

    0.3

    Air

    Plan-NeoFluar

    5.2

    >90% [450-750]

    BF, DIC, Fluo

    0.17

    6

    Empty


    BF: Bright-field
    DIC: Interference contrast


  • Filter cubes
  1. Empty
  2. BS_455
  3. LSM TFT80/20 1447-381
  4. BF RL TIRF Calibration 424928
  5. Set 76 C/G/Dr
  6. Set 77 G/R/A6
  7. Position

    Nom

    Marque

    Identifiant

    Filtre d'excitation 

    Miroir dichroïque

    Filtre d'émission

    Commentaire

    1

    Empty


    2

    BS_455

    Zeiss


    455LP


    To be used with FRAP 405

    3

    LSM Duo T20/R80 UV

    Zeiss


    4

    Brightfield Ref Light

    Zeiss


    5

    Set 76 CFP GFP DsRed

    Zeiss

    489076-0000-000

    390-422
    484-501
    549-573

    427
    503
    578

    448-472
    512-538
    585-631


    6

    Set 77 GFP/RFP/Alexa633

    Zeiss

    489077-0000-000

    469-497
    552-577
    629-650

    506
    582
    659

    510-542
    587-614
    665-711


Startup
  1. Turn on the computer (#1)
  2. If required, turn on the incubation power bar
  3. Turn on the camera and laser power bar on the left of the microscope (#2)

  4. Turn on the microscope power bar on the right of the microscope (#3)

  5. Use your UdeM credentials to log in to Windows

    When using for the first time, it is necessary to import the microscope-specific parameters BEFORE starting the software. See the First Use section below.

  6. Start the Zen Blue software

First Use

When using for the first time, it is necessary to import the microscope-specific parameters into the software. This procedure is usually carried out during the training session. However, it is also possible to use it to reset the software if it is not displayed correctly, for example.

Please note, this procedure will delete all your experiment protocols and restore the software to its original settings.

  1. If open, close the Zen Blue software and wait for it to close completely (up to 30 seconds)
  2. On the Desktop open the Documentation folder
  3. Double-click Settings for Axio-Observer Z1
  4. A script will run and a black window will appear briefly
  5. You can then reopen the Zen Blue software
Loading samples

This procedure puts the microscope in a safe configuration and performs a focus calibration. At the end of this procedure the microscope will be ready for acquisition.

Focus Calibration Z

On the microscope touch screen:

  1. Press Home>Load Position to lower the stage to its lowest position
  2. Press Set Work Position to store this position
  3. If necessary, move the focus slightly up to remove the “Lower Z limit reached” message displayed on the touchscreen
  4. Press Home>Microscope>Turret>Objectives>10x to select the 10x objective
  5. If asked, tap Done to remove the oil lens cleaning warning
  6. Press Home>Microscope>XYZ>Position>Z-Position>Set zero>Auto to perform focus calibration
  7. Press OK to start the focus calibration procedure
  8. Wait a few seconds for the calibration to be completed

Once calibrated, the focus can be found at Z = 5 mm). The Z value can be found on the microscope touch screen Home>Z-Position

First focus

Make sure to calibrate the focus before performing the first focus.

On the microscope touch screen:

  1. Press Home>Microscope>Turret>Objectives
  2. Press 10x to select the 10x lens

    The 10x objective is the safest because it has the longest working distance (5.3 mm). The sample will appear perfectly sharp long before the lens approaches it. It is recommended to always first focus with the safest lens. The objectives are para-focal, focusing with the safest objective will then allow you to easily find your sample with another objective.

  3. Press Home>Load Position to lower the stage to its lowest position
  4. Press Set Work Position to store this position
  5. If necessary, move the focus slightly up to remove the “Lower Z limit reached” message displayed on the touchscreen
  6. Place the test slide on the microscope stage with the coverslip toward the objective

    Always use the test slide to perform the first focus.

  7. If necessary, move the stage so that the sample is centered on the objective

On the computer:

  1. Open the Zen Blue software
  2. In the Locate tab, select BF or the desired fluorescence ((CFP/GFP/DsRed ou GFP/RFP/Cy5, etc…) to activate the configuration
  3. Adjust the focus with the main dial while looking through the eyepieces until the image is perfectly sharp

    Once calibrated, the focus can be found at Z = 5 mm). The Z value can be found on the microscope touch screen Home>Z-Position


  4. In the Locate tab, select Off to turn off the illumination
Seconday focus

Important

First focus with the safest lens before selecting another lens and continuing with secondary focus.

Focusing with air objectives

This microscope does not have additional air objectives. However, if there were, the procedure would be as follows:

After performing the first focus, on the microscope touch screen:

  1. Press Home>Microscope>Turret>Objectives
  2. Press on the desired lens

In Zen Blue software:

  1. In the Locate tab, select BF or the desired fluorescence (CFP/GFP/DsRed ou GFP/RFP/Cy5, etc…) to activate the configuration
  2. Adjust the focus with the precision dial while looking through the eyepieces until the image is perfectly sharp
  3. In the Locate tab, select Off to turn the illumination off
  4. Your sample is ready for acquisition!
Focusing with oil lenses

After performing the first focus, on the microscope touch screen:

  1. Press Home>Microscope>Turret>Objectives
  2. Press 63x Oil (1.4) or 100x Oil (1.4) to select the desired lens. The microscope will automatically lower the stage so that the sample is accessible.

    The 63x objective is the best oil objective because it has the most optical corrections (Plan Apochromat) and the largest numerical aperture (1.4). It offers a lateral resolution of 240nm at a wavelength of 550nm.

  3. Remove your sample from the microscope
  4. Place a drop of oil on the objective
  5. Replace your sample from the microscope
  6. Press Done. The microscope will automatically return the sample to its original position

In Zen Blue software:

  1. In the Locate tab, select BF or the desired fluorescence (CFP/GFP/DsRed ou GFP/RFP/Cy5, etc…) to activate the configuration
  2. Adjust the focus with the precision dial while looking through the eyepieces until the image is perfectly sharp
  3. In the Locate tab, select Off to turn the illumination off
  4. Your sample is ready for acquisition!
Storage management
  • Files can be saved temporarily (during acquisition) on the local C: drive (desktop)
  • At the end of each session, copy your data to your external drive and delete it from the local C: drive
  • You can store your files on the D: drive (Data Storage). If you do, please create a folder per laboratory using the principal investigator last name. Within, create one folder per user (Firstname_Lastname).

In any case, your files should be removed from the C: drive.

Shutdown
  1. Save your data
  2. Close the software Zen Blue
  3. Transfer your data to the D: drive (Data Storage) or to your external drive and delete it from the local C: drive
  4. If used, turn of the incubation power bar
  5. If used, clean oil lenses with lens cleaner and paper
  6. Turn off the microscope power bar on the right of the microscope (#3)

  7. Turn off the camera and laser power bar on the left of the microscope (#2)
  8. Turn off the computer

Important Reminders

  • Take back your samples including ones in the microscope
  • Leave the microscope and the working area clean

The following diagrams allow you to follow the light path in transmitted light (bright field, DIC) and in reflected light (fluorescence).

To do
Check Loss of 488nm laser power
2024-04-26

Problem with the FRAP module:

At first could not modulate the laser intensity (yet could not find the spot on the field), rebooted and then the FRAP fiber does not carries any light (even 488)

2024-03-04

Corrected Trigger Module configuration for the BackCam

  • reassigned each camera with its own trigger module in MTB config 
2024-02-29
  • DualCam calibration parameters set, using beads
  • Realigned Lasers:
    • Laser output measured in spinning disk mode at the sample with 10x objective, 1x Extended tubelens, 100% laser power and ALL lasers ON:
      • 405nm: 0.70 mW before => 0.66 mW after
        • with laser 488 OFF: 0.81 mW before => 0.83 mW after
      • 488nm: 3.75 mW before => 4.17 mW after  
        • with laser 405 OFF: 3.95 mW before => 4.33 mW after
      • 561nm: 2.1 mW before => 2.37 mW after 
      • 639nm: 0.9 mW before => 1.1 mW after 
  • NOTE: AOTF2 for FRAP

AOTF2 calibration

For FRAP, the illumination is strongest with the AOTF2 at 60% and not 100%

  • Error message when switching between FRAP & SD illumination

AOTF2 Error message

FRAP/SD illumination switching triggers an error message " 'MTBAOTF2LaserLine6' is not supported by the current hardware"

2021-11-20
  • Zen 2.6 updated hotfix 12
  • Microsoft Windows update
  • Laser output measured in spinning disk mode at the sample with 10x objective, 1x Extended tubelens, 100% laser power and ALL lasers ON:
    • 405nm: 1.08 mW StdDev 0.01mW
    • 488nm: 3.3 mW  StdDev <0.01mW (3.7 mW if laser 405 is OFF)

      405nm and 488nm Interactions

      When both 405nm and 488nm laser are ON simultaneously, the output power is decreased by 11%.

    • 561nm: 2.6 mW StdDev <0.01mW
    • 639nm: 1.37 mW StDev 0.02 mW
  • Control for vibrations during construction work on the 4th floor

2021-11-03
  • Error when the definite focus is used (unexpected error the definite focus did not respond)
  • To solve it:
    • Turn off the Zen Software
    • Turn off the microscope power bar (#3)
    • Turn off the definite focus by pressing and holding the definite focus button
    • Turn on the definite focus by pressing once the definite focus button
    • Wait until the definite focus display shows "Detecting stand"
    • Turn on the microscope power bar (#3)
  • Confirm that the definite focus is showing in the microscope tactile display
  • Open Zen software and run an experiment using the definite focus to confirm it is fully functional
2021-09-27
  • Added to wiki

Stand

  • Zeiss AxioObserver Z1 upright System ID: 1023798490; Serial number: 3834004569
  • Left imaging port camera adapter Model 60N-C, 2/3", 1x, Model: 426118-9000 for Yokogawa spinning disk

  • Yokogawa Spining disk CSU-X1 Serial 175116

  • Manual Field diaphragm for transmitted light

  • Right imaging port camera adapter witth slider 423685-9000 Axicam MRm r3.1 426509-9901-000 Serial 1-44-11-5127

Light sources

  • LED lamp for transmitted light 423053-9080
  • Lumencor SOLA V-nIR Serial 27536 

Condenser

  • Motorized condenser NA 0.55 WD 26mm 
  • Filter turret 6 positions manual

  1. Empty
  2. Empty
  3. Empty
  4. Empty
  5. Empty
  6. Empty

Objectives

  1. 10x/0.30 Air WD 5.30

  2. 63x/1.46 Oil WD 0.19

  3. 100x/1.46 Oil WD 0.17 

Stage

  • Motorized stage ASI MIV-2000
  • Remote control joystick ASI MS-2000 #1111-2112-3426-2020 Model WK-XYB-AV200-PZ
  • Remote touch screen 432907-9901
  • Inserts
    • Combo Slide and petri ASI I-3091
    • Plate ASI I-3020

Filters

6-positions motorized filter wheel

Detector

  • 2 camera Evolve 512 Serial A10G104008 A16F104001
  • Definite Focus 1

Workstation

  • HP Z840 Workstation Serial: CZC7498KCQ
  • 2 x Intel Xeon  E5-2623 v3 3.0 GHz
  • RAM 64 GB DDR4 1200 MHz ECC (4 x 16 GB)
  • OS 1 TB SSD 550 MB/s
  • 4 TB HD Data Storage (2 x 2 TB spanned volume) 110 MB/s
  • Video Card NVIDIA Quadro K2200 4 GB DDR5
  • Monitor HP ZR24W  24' 1920 x 1200
  • Software Zen Blue 2.6 Hotfix 12

Incubation

  • Zeiss Incubation Pecon XL Multi S1 Dark LS Serial 0509311 Zeiss #411857-9540-000

Consumables

Troubleshooting

I don't see my sample

The spinning disk is a multipoint confocal. Outside the focal plane the sample disappears completely. It is therefore easier to find your sample through the eyepieces. Follow the tuning procedure to achieve this.

I don't see any fluorescence!

The best way to solve a problem in Microscopy is to follow the light path. You will find in the Light path tab of this page, the diagrams which will allow you to follow the light all along its path through the microscope.

  1. Open the light path file
  2. Starting from the light source and moving towards the detector, verify that there is indeed light after each component of the microscope

FAQ

Can I use this microscope to look at cell in a dish?

Yes. It is an inverted microscope designed for the observation of living specimens. The spinning disk is particularly appreciated for its limited phototoxicity. This is an inverted microscope designed to look at specimen in a dish or a multi-well plate. The objectives are optimized to image through thin glass bottom multi-well plates. You may also image specimen mounted between a slide and a 0.17mm thick coverslip.


Core Facilities CIB               Structural Biology    |    Cytometry    |    Microscopy    |    Histology